Tuesday, 30 October 2012

Recent Work: Balanced Eyes, Lips, and Cheeks

Here are some of my favourite makeup looks that I have done over the last couple of months.  I chose these looks specifically because each one of these looks demonstrates balance between the eyes, lips, and cheeks.  When doing a heavier eye, it's usually most flattering if you pair it with a more muted tone on the lips so that it does not compete with the eye.  When doing bright or dark lips, it's best to apply a softer eye so that all the attention remains focused on the lip.  When trying to achieve a soft, natural look, I find the best way to accomplish this is by using a palette of soft shades on both eyes and lips.  The impact comes from applying a set of fluttery full lashes so that the eyes still manage to stand out without using any dark or heavy shades.  

Balanced Face: Soft Shades: 
As you can see Amber's face is well-balanced with a palette of soft shades of pink, plum, and taupe.  She wanted a really glowy look so I used a pale peach high lighter on her cheekbones.  Face: MAC Matchmaster Foundation, Select Cover Up, and Mineralize Skinfinish Natural.  Cheeks: MAC Bronzing Powder in Golden, MAC Blush in Well Dressed, MAC Mineralize Skinfinish in Soft and Gentle buffed in to the tops of her cheekbones Lips: MAC Lustreglass in Love Nectar 


Eyes: MAC Paint Pot in Bare Study, MAC Eyeshadows in Et Tu Bouquet, Patina, Glamour Check, Shroom, MAC Kohl Power in Raven, Ardell Demi Luvies False Eyelashes
Sabrina wanted a natural look, but wanted her eyes to stand out.  Her bridesmaid dress was a soft, celadon green so I wanted to use a similar palette without making it too matchy-matchy.  Face: MAC Matchmaster Foundation, MAC Select Cover Up, MAC Mineralize Skinfinish Natural, Cheeks: NARS Bronzing Powder in Laguna, MAC Blush in Well Dressed and Instant Chic, MAC Mineralize Skinfinish in Soft and Gentle to highlight.  Lips: MAC Lipstick in Angel, MAC Lipglass in C-Thru
Eyes: MAC Paint Pot in Bare Study, MAC Eyeshadows in Shroom, Vex, Patina, Mulch, MAC Chromaline in Black Black, Ardell Demi Luvies False Eyelashes
Balanced Face: Bright Lips, Soft Eyes
Kate was planning on wearing a gorgeous bright pink dress to a wedding.  As soon as she said that I knew I wanted to do an updated take on a retro-glam look.  Instead of doing red lips, I chose to do a bright coral-pink and it looked stunning on her.  Since the lips were the focus here, I chose to do a soft, neutral eye.  Face: MAC Matchmaster Foundation, MAC Select Cover Up, MAC Mineralize Skinfinish Natural, Cheeks: MAC Bronzing Powder in Golden, MAC Blush in Fleur Power, MAC Mineralize Skinfinish in Soft and Gentle to highlight.  Lips: MAC Lip Pencil in Lasting Sensation, MAC Lipstick in Party Parrot
Eyes: MAC Paint Pot in Bare Study, MAC Eyeshadows in Naked Lunch, All that Glitters, Omega, Soft Brown, Charcoal Brown, and Shroom, Revlon Colorstay Liquid Eye Pen, Ardell 136 False Eyelashes
Balanced Face: Strong Eyes, Muted Lips
Catia was standing in a wedding and wanted dramatic eyes to be the focus of her look.  She showed me a picture of a really defined, contoured smoky eye and I was pretty excited to re-create it for her.  Strong eyes call for subdued lips and that's exactly what I did here.  Face: MAC Matchmaster Foundation, MAC Select Cover Up, MAC Mineralize Skinfinish Natural, Cheeks: NARS Bronzing Powder in Laguna, MAC Blush in Melba, MAC Mineralize Skinfinish in Semi-Precious Goldstone to highlight.  Lips: MAC Subculture Lip Pencil, MAC Shy Girl Lipstick, MAC Love Nectar Lipglass
Eyes: MAC Paint Pot in Nubile, MAC Eyeshadows in Naked Lunch, Dazzlelight, Shroom, Soft Brown, Patina, Typgraphic, and Carbon, MAC Kohl Power in Feline, MAC Chromaline in Black Black, MAC #36 lashes. 
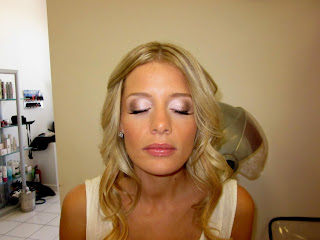
Lisa wanted a really dramatic smoky eye with pinks and greys so I knew the rest of her face had to kept a bit softer.  Soft pink cheeks and a soft pink lip complemented her eye makeup beautifully.  Face: MAC Matchmaster Foundation, MAC Select Cover Up, MAC Mineralize Skinfinish Natural, Cheeks: MAC Bronzing Powder in Golden, MAC Blush in Well Dressed, MAC Mineralize Skinfinish in Porcelain Pink to highlight. Lips: Sheer pink lip gloss by Quo (shade name not known). 


Eyes: MAC Paint Pot in Nubile, MAC Eye Shadows in Pink Freeze, Shroom, Star Violet, Perky, Print, Typographic, MAC Chromaline in Black Black, MAC Kohl Power in Feline, Ardell Demi Wispies False Lashes
 I hope you enjoyed reading all about balancing your look!  Hopefully this has inspired you to try something new - whether it's a bold lip or adding some false lashes for some drama.  Just remember to have fun!

x
Annemarie

Tuesday, 28 August 2012

Skin Prep and Skin Care

As a freelance makeup artist, I come across a number of different skin types.  A few problems that I find my clients complain about is that their makeup doesn't last throughout the day, their skin feels dry, and their skin is too oily.  Fortunately for them, these problems can be solved by getting into the habit of prepping your skin before you apply makeup.  Not only will your makeup apply more smoothly and last longer throughout the day, but your skin itself will look and feel so much better.  There are so many skin care products out there and finding the right products for your skin can be a bit daunting.  Here are a few of tips that I have found to work for me.

Cleanse:
The first step to achieving smooth, even skin is to find the right facial cleanser for your skin type.  Whether you have normal, dry, oily, combination, sensitive, mature, or dehydrated skin, there is cleanser out there for you.  Cleansers can be anywhere from cleansing milks, cream cleansers, foaming cleansers, and gel cleansers.  Some of my favourite brands are Vichy, Neutrogena, L'Oreal, and Biotherm.

Exfoliate:
The next step is exfoliation.  Have you ever noticed that your skin feels a bit rough in texture, or you have dry flakes around your nose or on your forehead?  That's most likely due to the fact that you have not exfoliated in a while.  When you exfoliate, you remove any dead skin cells that have built up onto the surface of your skin.  They can dull your complexion, clog your pores, and generally make your skin look and feel not as healthy as it could be.  When you exfoliate your skin will absorb serums and moisturizers much better as they will be sinking into your skin rather than sitting on top of your skin.  Exfoliation can be done a number of different ways, from using a washcloth with your facial cleanser, to a facial scrub, to using a brush such as the Clairsonic.  Whatever method you choose is entirely up to you as long as you exfoliate regularly which is typically 2-3 times per week, although the Clairsonic is gentle enough to be used daily. 

Tone:
After you've exfoliated it's a good idea to tone your skin.  Sometimes people find this step unnecessary however it is essential to further remove any traces of dirt, oil, makeup, and cleanser that have remained on your skin.  Simply take your favourite toner (I like the Neutrogena Alcohol-Free Toner) apply some onto a cotton pad and gently smooth it across your forehead, nose, cheeks, and chin. 

Moisturize:
Lastly, the final step is applying the appropriate moisturizer for your skin type.  This step is essential not only to restore the moisture in your skin after cleansing, but for smooth, even makeup application.  The most common misconception for people with oily skin is that they don't have to moisturize their skin because it's already oily.  By not moisturizing they are actually encouraging more oil production because their skin is working overtime to restore the balance.  The simplest solution is to use a lightweight gel moisturizer such as Vichy Aqualia Thermal Aqua-Gel, or Clinique Pore Refining Solutions Stay Matte Hydrator.   Normal skin can get away with using a very basic oil-free moisturizer such as Neutrogena Moisture Oil-Free.  Dry skin types will find that a richer moisturizer is best for them.  Biotherm's Aquasource Deep Hydration Replenishing Cream is one worth trying, as is Vichy Aqualia Thermal in Rich. 

Eye Creams, Face Primers, and Lip Prep:

If find that eye creams are a product that people either love or find totally useless.  I recently started using an eye cream simply to hydrate the delicate under-eye area and I absolutely love it.  My under-eye concealer goes on a lot smoother and the fine lines around my eyes are a bit softer because that skin is getting moisture.  I'm addicted to MAC's Mineralize Charged Water Moisture Eye Cream.
Face primers really do help extend the wear of your makeup.  They smooth over any fine lines, pores, and help keep shine at bay.  Some of my favourites include Smashbox Photo Finish Primer and MAC Prep + Prime Skin.
Lip Prep is something that I am often guilty of overlooking at times.  Dry skin flakes on your lips don't allow for a smooth lipstick application and can actually cause lipsticks to fade quicker.  A quick exfoliation and application of lip balm can do wonders.  Simply take a damp wash cloth and gently go over your lips in a circular motion until all flakes are removed.  Once you've finished you can apply your favourite lip balm.  My favourite is MAC Lip Conditioner.  I like to apply it to my lips before makeup so that it has a chance to really sink into my lips while I finish the rest of my face.  Just blot the excess moisture away with a tissue and you are set to apply your favourite lipstick or lip gloss. 

Hopefully you have learned a few things today about skin prep and it's benefits!  I think if you follow these steps you will notice a change in the way your makeup applies and wears throughout the day.  If you have come across an amazing product and would like to share it, please let me know in the comment section below!

x
Annemarie


Please Vote!

Hi Everyone!

Wedding Industry Experts is hosting a contest to recognize the best wedding vendors in the area. I would be so awesome and very much appreciated if you would vote for me in the category for Best Makeup Artist in the Windsor area.  You can vote once a day until August 31st! Just click on the link below.

http://www.weddingindustryexperts.com/votes/AaeQ9yiDv.html

I truly appreciate all the support!

Thanks again,

x
Annemarie

Friday, 10 August 2012

I'm Back!!

Summertime is usually the busiest time of the year for me due to having weddings booked almost every weekend.  Not to mention my social calendar seems to fill up quicker than in the winter months - yes I am THAT big of a deal (just kidding).  So with that said, I'm sorry I've been MIA for the last few weeks!  Things have been pretty busy but I promise to update the blog with some new reviews, beauty breakdowns, and tutorials.  If you have any specific requests I'd be happy to feature them on the blog!  Let me know in the comments below. 
Until then, here are some professional photos from one of my past brides Tegan. The photos were taken by Eryn Shea Photography.  Eryn was also my wedding photographer and she takes amazing photos!  If any of you are looking to book a wedding photographer I highly recommend her.  Check out my work on some of my past brides on her blog:
Jessica & Derek
Elisa & Anthony
Carrie & Chris
Monika & Chris


Enjoy!

x
Annemarie

Wednesday, 30 May 2012

Favourite Looks of the Month: May 2012

I have been pretty busy on Saturday mornings now that wedding season is in full swing.  I've decided to show you a few of my favourite looks for the month instead of doing a break down of each face.  I hope you enjoy these looks and that they inspire you to try something new!

Face: MAC Mineralize Skin Finish Natural Medium Dark, MAC Stuio Sculpt Concealer NW25, Nars Laguna Bronzer, MAC Well Dressed and Peachykeen blush, MAC Mineralize Skin Finish in Porcelain Pink
Lips: MAC Subculture Pencil, Lise Watier Stylista Lip Gloss

Eyes: MAC Nubile Paint Pot, MAC Hush, Mylar, Patina, and Soft Brown eye shadow, MAC Pink Opal Pigment, MAC Kohl Power Eye Pencil in Feline, Ardell 136 lashes

Face: MAC Matchmaster Foundation 1.5 and 3, MAC Pro Longwear Concealer NW20, MAC Mineralize Skinfinish Natural Light Plus, MAC Golden Bronzing Powder, MAC Instant Chic and Well Dressed Blush
Lips: MAC Subculture Lip Pencil, MAC Pro Longwear Lip Creme in To the Future!, MAC Instant Gold Lustreglass

Eyes: MAC Nubile Paint Pot, MAC Kohl Power Eye Pencil in Feline  MAC Club, Satin Taupe, Shroom, Soft Brown, Woodwinked, and Smut eyeshadows, Ardell Demi Wispies False Lashes

Face: MAC Matchmaster Foundation in 3 and 5, MAC Select Cover Up in NW25, MAC Mineralize Skin Finish Natural in Medium Dark, Nars Laguna Bronzer, MAC Peachykeen and Melba Blush, MAC Mineralize Skin Finish in Soft & Gentle
Lips: MAC Subculture Lip Pencil, MAC Pro Longwear Lip Creme in To the Future! MAC Love Nectar Lustreglass

Eyes: MAC Bare Study Paint Pot, MAC Eye Kohl in Teddy, MAC Kohl Power Eye Pencil in Feline, MAC Eyeshadows in Bronze, Mulch, All that Glitters, Shroom, and Smut, Ardell 109 False Lashes

Face: MAC Matchmaster Foundation 1.5 and 3, MAC Pro Longwear Concealer NW20, MAC Mineralize Skin Finish Natural in Light Plus, MAC Golden Bronzing Powder, MAC Peachykeen Blush, MAC Mineralize Skin Finish in Soft & Gentle
Lips: MAC Pro Longwear Lip Pencil in Etcetera, MAC Lipstick in Shy Girl, MAC Plushglass in Wildly Lush

Eyes: MAC Bare Study Paint Pot, MAC Powerpoint Eye Pencil in Prussian, MAC Contrast, Vex, Soft Brown, and Mylar eye shadows, MAC False Lashes Mascara

Face: MAC Mineralize Skin Finish in Medium & Medium Plus, MAC Pro Longwear concealer NW20, MAC Golden Bronzing Powder, MAC Pinch O Peach blush
Lips: MAC Pro Longwear Lip Pencil in Etcetera, MAC Sheen Supreme Lipstick in Supreme Style

Eyes: MAC Nubile Paint Pot, MAC Orb, Shale, Trax, Patina eye shadows, MAC Dark Diversion Fluidline, MAC Kohl Power in Raven, Ardell 136 lashes (trimmed)


x
Annemarie

All About Mascara: My Favourites...and The Not So Great Ones


I have been on the hunt for a good mascara lately.  Mascara is something that I rarely spend a lot of money on simply because I replace it so often (usually at the first sign of any flakiness or dryness).  I have tried everything from Maybelline Great Lash to Dior Show Mascara, and I find that the drugstore brands work just as well as any high-end luxury brand.  This is just my opinion on what works for me.  I'm going to share with you all a small selection of mascaras that I have found to have worked for me in the past. I judge this based on whether or not I have repurchased the mascara on more than one occassion. Some of these I have only used once, but judging on how well they are working for me now, I am planning on replacing them once its time to do so.  I know your opinions and preferences may vary from mine, but if you're looking for a new mascara you might want to give one of these a try.

Some of my favourites:

Cover Girl Lash Blast 24-Hour:
This mascara is by far the best drugstore mascara I have ever tried. It volumizes, separates, actually holds the curl of my lash, and it does not flake. The ONLY drawback to this mascara is that it is difficult to remove. The label does not indicate that it is a waterproof mascara, but rest assured it definitely is. I don't recommend waterproof for every day use because it does take a toll on your lashes. If you're in the market for a new waterproof mascara, then this one is worth a try.
Cover Girl Lash Blast Mascara
Cover Girl Lash Blast 24-Hour Mascara wand
 Cover Girl Lash Blast Volume:
This product was launched a few years ago and has been one of my all-time favourites - until recently.  It promises to build volume, separate, and multiply the look of your lashes and I have to say it does do all those things.  The only drawback for this mascara is that it flakes.  I cannot tell you how many times I've noticed little flecks of mascara on my cheeks and under my eyes when I've worn this mascara.  Flaking aside, I definitely would still wear this mascara because it does do a great job. 
Cover Girl Lash Blast Volume Mascara
Cover Girl Lash Blast Volume Mascara wand

L'Oreal Voluminous False Fiber Lashes:
There have been many variations of L'Oreal Voluminous mascara over the years and I always seem to get suckered into trying them out. The latest formula by L'Oreal is the Volminous False Fiber Lash mascara. For an everyday mascara for those of you want full lash look, you can't go wrong with this mascara. It thickens, lengthens, and slightly separates the lashes, but it does not hold the curl very well and towards the end of the day I have experienced a little bit of flaking. All in all, it's a good mascara and it's easy to find at most drugstores. 
Voluminous False Fiber Lashes Mascara
L'Oreal Voluminous False Fiber Lash Mascara wand

Bourjois Volume Glamour Max:
This product was a recent find for me when I was looking to replace my tube of Lash Blast 24-Hour mascara.  I did some research prior to purchasing this mascara because I was tired of being disappointed in every mascara I tried. After reading some great reviews online, I decided to give this a try. I have to say I have been very happy with this product. It has a nice big brush, but it's not so big that I can't manoeuvre the wand. I usually apply two coats and the end result is a full, volumized look with very little clumping and flaking. This is a great mascara for an evening look, but you can definitely wear it during the day. It's my favourite mascara at the moment.

Bourjois Volume Glamour Max Mascara
Bourjois Volume Glamour Max Mascara wand


MAC Extended Play Lash Mascara:
This is a brand new mascara by MAC Cosmetics. I have tried quite a few MAC mascaras and have been consistently disappointed in the quality of each one that I tried...until now. This mascara is pretty awesome! The brush is quite thin and long and when you apply it to your lashes, it feels like it is almost gripping each lash and lengthening each one. I usually find the consistency of MAC mascaras to be really wet and runny and I end up with more mascara on my eye lids than on my lashes, but this mascara does not seem runny at all. This is perfect for a day look because it's not too heavy but you can still tell you have something on your lashes. This would be a great product to apply over a volumizing mascara (like the Bourjois) to help separate and define the lashes if you need it. This is quickly becoming one of my favourite mascaras as well.
MAC Extended Play Lash Mascara
MAC Extended Play Lash Mascara wand


Now for the not so great mascaras:

Maybelline Great Lash:
I have never understood the hype about this mascara! I tried it once back in high school and I have never wanted to try it again. I applied three coats of this mascara and it did absolutely nothing for my lashes. I know there are people out there that swear by this product so I'm not going to knock it too much, but I will just say that there are definitely better mascaras out there that you can try.
 

Revlon Grow Luscious Plumping Mascara:
This mascara started out okay but after a couple of weeks of using it, I had to stop because it really did nothing for my lashes. It did not lengthen, separate, curl, or thicken at all. My lashes looked like one big clump every time I wore this product. The formula reminded me of some MAC mascaras - it was really watery and I ended up getting the product all over my lids. 
Revlon Grow Luscious Mascara
Revlon Grow Luscious Mascara wand


As you can see I always go for a volumizing, thickening type of mascara. I have tried mascaras solely for lengthening or curling, but I always end up missing the voluminous look. Is it too much to ask for a mascara that lengthens, separates, curls, volumizes, and doesn't flake? :) I know my expectations are a bit high so I'll always be on the lookout for the next best thing to make my lashes look outta this world amazing.  If I find it, I'll be sure to let all of you know, but in the meantime, these mascaras are definitely worth checking out! 

x
Annemarie

Monday, 7 May 2012

MAC PRO Master Class: Close-Up Makeup with MAC Senior Artist Romero Jennings

Yesterday I attended my first MAC PRO Master Class at the MAC Store at Somerset Mall in Troy, MI.   I have been wanting to attend a PRO Master Class for some time now and I was thrilled to hear that MAC Senior Artist Romero Jennings would be teaching us all about Close-Up Makeup.  This class was all about really detailed makeup looks that focus on specific features, such as a really bold lip, or a really structured, graphic eye with a great set of false lashes.  Basically looks that you would see in a magazine editorial.  For the two looks Romero demonstrated for the class, he focused on eyes and lips.
Romero is such an amazing talent!  I was in total awe of his skill, his knowledge, and most importantly his organized makeup kit.  He has over 20 years of experience working in the industry and he shared so much of what he knows with us.  He even passed his portfolio around so we all could have a look through it.  I thought I knew a lot about makeup, but this class made me realize that there is always something new to learn. 
For the makeup demonstration, Romero followed the same steps for each look but adjusted the shades according to the model's skin tone.  He really stressed the importance of starting with clean, prepped, and primed skin.  This allows you to use less foundation plus it allows for longer lasting coverage.  He prepped the skin by spritzing Mineralized Charged Water all over the face and exfoliated with a MAC wipe.  He followed up by stippling on Mineralized Charged Water Moisture Gel with a 109 brush.  Lastly, he applied Mineralized Charged Water Moisture Eye Cream under the eyes.  You really want to use lightweight products because if you use really heavy, emollient products, the rest of your makeup will smudge and smear and not stay in place. 
LOOK #1
For foundation he mixed Matchmaster Foundation in shades 1 and 2 and tapped it on the face with a 109 brush.  He concealed under the eyes with a bit of Studio Finish concealer and a 222 brush.  Instead of using the back of his hand, Romero uses an empty 4x4 eyeshadow palette and mixes the shades as he needs them.  He then used Fascinating Eye Kohl (a white pencil) and drew along the lines on the side of the mouth, and underneath the eyes and buffs the line away with a bit of Studio Finish concealer.  This allows any receded areas of the face to appear flat.  Using a 116 brush, he set the foundation and concealer with a bit of Prep & Prime Transparent Powder and Studio Careblends Pressed Powder.  He uses a tapping technique to apply this powder as well.  To contour the face, he used Omega eye shadow and an angled 168 brush.  Starting at the hair line at the cheekbone, he applied Omega shadow and faded the colour toward the centre of the face.  He used the same technique along the temples and the hair line.  This creates a spotlight effect- the centre of the face is brighter and the sides of the face are darker.  This also brings out her bone structure without using heavy foundations or bronzers.  To highlight the cheekbones he applied Luna Cream Colour Base with a 227 brush right underneath the outer corner of her eyes right on top of the cheekbone.  He then swept the colour toward her hairline across her temple.  He highlighted her inner corners and along the lower lash line with Nylon shadow and a 219 brush.  For the crease, he used Teddy Eye Kohl and dotted a line along the crease and blended it out following the eye shape with a bit of Omega eye shadow and a 224 brush. He also applied Omega shadow to the lower lash line with a 219 brush.  For the brows, Romero wanted to show a bleached look without using bleach.  He used a mascara wand and applied a combination of a white, yellow, and skin toned concealer shade and carefully applied it to her brows, making sure not to touch her skin.  He then curled her lashes and primed them with a bit of Prep & Prime Lash Primer right at the root of the lash.  Romero used a customized pair of #36 lashes.  He customized them by cutting them in half and layering and fanning the two pieces on top of each other. This will allow more focus to be on the outer corners of the eyes.  He then applied a coat of False Lashes Mascara in Extreme Black.  He accented the centre of the lid with Pink Opal Pigment.  He used the same pigment on top of the Luna Cream Colour base on the tops of her cheekbones.  For lips he lined and filled them in with Pro Longwear Lip Pencil in What a Blast! and topped them off with a bit of Dazzleglass in Sugar Rimmed.  Lastly, he finished the look with a bit of Peachykeen Blush tapped on the apples of her cheeks with a 116 brush. 


LOOK #2
For the second look, he contoured with Saddle Eye shadow, highlighed the tops of the cheek bones with Improper Copper Cream Colour Base, and highlighted the inner corners of the eyes with Amber Lights eye shadow.  For the eyes he contoured the crease with a black pencil and highlighted the center of the lids with Blue Brown Pigment.  For lips he used Pro Longwear Lip Pencil in Bittersweet and a bit of Dazzleglass in Funtabulous on top.  As a final touch he added colour to her cheeks with a bit of Peachykeen and Frankly Scarlet blush. 

You can purchase all products used at www.maccosmetics.com
Romero Jennings was nice enough to pose for a picture with me!

This class was such a great experience for me!  I look forward to taking many more PRO Master Classes in the future to brush up on my skills because like I said earlier, there's always something new to learn.  Romero Jennings was such a great teacher - I hope he makes his way back to Michigan sometime soon.  If you're a PRO artist and have yet to take one of these classes, I suggest you take a look at www.macpro.com to see if they're offering any classes in your area. 

x
Annemarie


Wednesday, 25 April 2012

Review: MAC Lips & Tips/Fashion Sets Collection - Photos & Swatches


Today I wanted to share with you all a couple of new MAC products that I recently purchased.  I was doing my usual visits to my favourite beauty blogs and forums a few weeks ago and I read about one of MAC's many new collections for Summer 2012: Fashion Sets/Lips and Tips.  It consists of lipstick, lipglasses, and nail polish.  What's so special about this collection is that they have taken 16 lipstick shades (13 permanent and 3 limited edition) and created lipglasses and nail polishes to match.  All lipglasses and nailpolishes, plus 3 lipstick shades are limited edition.  Each 'set' contains a lipstick, lipglass, and nailpolish in the same shade, however each product can be purchased separately.  Temptalia has a listing of all the shades available in this collection.  You can find it here.  If you'd like to take a look at other upcoming MAC Collections, you can find them here at specktra.net. 
Since I am a PRO Member, I was able to purchase mine online yesterday.  Not all shades will be available at the counters, so if you have your eye on a particular shade, I suggest ordering online at www.maccosmetics.com
Anyone who knows me knows that I am a peachy/pink/coral lipgloss fanatic, so of course I had to pick up every peachy/pink/coral lipglass shade they had, plus a peach lipstick.  Peachstock is described as a light peachy nude. Myth is a light neutral nude that is great for layering.  Angel is a light, warm pink that is perfect for those who have a hard time pulling off cooler pinks.  Razzledazzler is a limited edition shade and it's a light cream peach.  Ravishing is a mid-tone neutral peach and it's probably one of my favourite MAC lipsticks in the permanent collection.  I love mixing Ravishing with paler colours like Myth and Peachstock to get that perfect, subtle peachy-nude without looking like a corpse.  Impassioned is a very bold choice for me, but I couldn't pass it up.  It's described as a bright warm pink.  Finally, Razzledazzler lipstick is a lustre formula so it's going to be on the sheer side.  Again, it's described as a light cream peach. 

Okay enough rambling from me, read on to take a look at the shades.  I am a MAC NC30 for reference. 


Photo taken with flash.

Photo taken in natural light.

Photo taken with flash.  I already had Angel and Ravishing in my collection so I wanted to include them for reference. 


This collection will be available for purchase on May 3, 2012.  If you're interested in picking up some of these shades I wouldn't wait too long! 

UPDATE: This collection is now available for purchase online at www.maccosmetics.com.  Use the code SETS for FREE express shipping!

x
Annemarie


Sunday, 22 April 2012

Bridal Beauty: Sarah's Makeup Trial

Today I had a makeup trial with one of my 2012 brides, Sarah.  Sarah and I took piano lessons together when we were kids for a number of years.  She was the pianist at my wedding and did such a beautiful job!  I was so happy to hear from her last year when she was looking for a makeup artist for her upcoming wedding. 

Sarah said she wanted a very natural look so I used a very soft palette of shades for her eyes, lips, and cheeks.


Face:
I prepped her skin and blended MAC Matchmaster foundation in shades 1.5 and 3 all over her face.  I used MAC Pro Longwear concealer in NW20 underneath her eyes and on her eye lids.  I set the foundation with MAC Mineralize Skinfinish Natural Powder in Medium.  I contoured her cheeks with a bit of MAC Golden Bronzing Powder and I applied a combination of MAC Stunner & Fleur Power blush on the apples of her cheeks.  As a final touch, I applied MAC Mineralize Skinfinish in Porcelain Pink on the tops of her cheek bones and down the bridge of her nose. 

Eyes:
I started by applying MAC Paint Pot in Bare Study very lightly all over the lid, from her lash line to brow bone.  I applied MAC Vapour eye shadow on her lid and highlighted her brow bone with MAC Mylar eye shadow.  I mixed a bit of MAC Soft Brown, Charcoal Brown, and Patina eye shadows and swept them into the crease using a window-wiper motion so that it was very soft and sheer.  I defined the outer corner with a bit of MAC Handwritten eye shadow and blended into the crease.  I used MAC Chromaline in Black Black and traced a thin-to-medium line across her upper lash line.  I applied a bit of MAC Feline Eye Kohl pencil along her bottom lashes and set the look with a bit of MAC Antiqued shadow to soften it up a bit. To finish off the eye shadow, I applied Make Up For Ever Star Powder in #947 on her lids and inner corner.  I used a bit of MAC Charcoal Brown eye shadow to fill in her brows, curled her lashes, and applied two coats of mascara.  (Yes, those are her natural lashes!)

Lips:
I applied MAC Pro Longwear Lip Pencil in Etcetera and filled in her lips with MAC Sheen Supreme Lipstick in Blossom Culture.  I finished the look off with a dab of MAC Prrr Lipglass. 

This look is a very classic bridal look that would work on just about anyone.  I look forward to seeing Sarah at her wedding later on this year!

x
Annemarie

Saturday, 14 April 2012

Latest Work: Beauty Breakdowns on Olivia, Martina, and Diane

Today I had a pleasure of spending my afternoon beautifying three lovely women.  This group of girls has played such a huge part in spreading the word about my freelance work.  They have such a big group of friends and  they all happened to get married in the last few years.  Lucky for me, they hired me as their makeup artist.  I really appreciate all of the call backs and referrals that they have given me over the years.  I was so happy to spend time with them today, and as an added bonus, I got do their makeup!  Keep reading for photos and a breakdown of their looks.

OLIVIA:
Olivia wanted a smoky eye, but instead of doing a traditional black or grey, we decided on a metallic look instead.

SKIN:
I prepped her skin with a bit of toner and moisturized with an oil-free moisturizer.  I then applied one pump each of MAC Matchmaster Foundation in 3 and 5.  I used a flat foundation brush and buffed the foundation into her skin.  I always start with a little product and add as I need it.  I used MAC Studio Sculpt concealer in NW25 under her eyes and on her eyelids.  I dusted a bit of MAC Mineralize Skinfinish Natural in Medium Plus underneath her eyes and in the T-zone and Medium Dark all over the rest her face.

EYES:
I started by using MAC Paint Pot in Nubile all over her lids as a base.  I then smudged MAC Eye Kohl in Teddy along her lash line and all over her lid and blended it out with a smudge brush.  I took a combination of MAC eyshadows in Satin Taupe and Sumptuous Olive all over her lid into the crease.  I highlighted her brow bone with a bit of MAC Shroom eyeshadow.  Lastly, I defined her outer corner of the lid (the V) with a bit of MAC Typgraphic eyshadow.  Using MAC Chromaline in Black Black, I traced a medium-thick line along her upper lash line.   I lined her bottom lashes with a bit of Satin Taupe and Typgraphic eye shadows.  I applied mascara and MAC #7 lashes. 

CHEEKS: 
I contoured with NARS Laguna Bronzing Powder and blended NARS Orgasm blush on the apples of her cheeks.

LIPS:
I lined her lips with MAC Subculture Lip Pencil and filled in the centre of her lips with MAC Naked Lip Pencil.  I applied MAC Viva Glam V lipstick and dabbed a bit of MAC Lustreglass in Instant Gold on top. 


MARTINA:
Martina had picture of a what she wanted for her eye makeup.  It was a really cool winged black eyeliner and shadow look and when I took a look at it I was pretty excited to try it out.  I always like the challenge of trying to recreate a look. 

SKIN:
I prepped and moisturized her skin and applied a combination of MAC Matchmaster Foundation in 3 and 5.  I used MAC Pro Longwear concealer in NW20 under her eyes and on her eyelids. I dusted a bit of MAC Mineralize Skinfinish Natural in Medium Plus underneath her eyes and in the T-zone and Medium Dark all over the rest her face.

EYES:
I started by priming her lids with MAC Paint Pot in Bare Study.  I applied MAC Grand Entrance eyeshadow to the inner 2/3 of her lids.  I then took a fine-pointed eyeliner brush and using MAC Chromaline in Black Black, traced a defined V in the outer corners of her eyes.  I then applied MAC Carbon eye shadow on top of the V and blended very well with a pencil brush.  With this look blending is so important.  I kept going back and forth between applying the black shadow and blending it out until the desired depth and shape was achieved.  I warmed up the space above her crease and just below the brow bone with a bit of MAC Soft Brown shadow.  I highlighted the brow bone with MAC Shroom.  I then applied the Chromaline liner to her upper lashes and applied MAC Kohl Power in Feline to the inner rims of her lower lash line.  I set the lower liner with Carbon shadow.  I applied mascara and Ardell's 110 lash for volume. 

CHEEKS:
I used NARS Laguna to contour and a combination of MAC Melba and NARS Orgasm on the apples of her cheeks.  I highlighted the tops of her cheek bones and the bridge of her nose with MAC Beauty Powder in Snowglobe & MAC Mineralize Skinfinish in Stereo Rose. 

LIPS:
I applied the same lip colours as Olivia to keep the focus on her eyes. 


DIANE:
Diane had this gorgeous dress with silver sequins on it so we decided to keep her makeup on the more subtle side.  I ended up doing a defined smoky eye on her with a bit of shimmering taupe, grey, and black. 

SKIN:
I prepped and moisturized her skin and applied MAC Matchmaster Foundation in 3 all over her face.  I concealed under her eyes with MAC Pro Longwear concealer in NW20.  I set the look with a bit of MAC Select Sheer Pressed Powder in NC30.  I used a bit of Benefit Powderflage to set and highlight under her eyes. 

EYES:
I primed her lids with MAC Paint Pot in Bare Study and applied MAC Grand Entrance eye shadow on her lids.  I then defined her outer V with a bit of Chromaline liner and blended well with MAC Typographic eye shadow.  I then applied MAC Satin Taupe shadow on her lids to blend the Typographic eyeshadow and to soften the look a bit.  I then took MAC Bronze eyeshadow and applied in into the crease to further warm up and soften the grey eyeshadow.  I highlighted her brow bone with MAC Shroom.  I applied Chromaline  on her upper lash line and winged out the liner a bit.  I used MAC Kohl Power in Feline on the inner rims of her lower lash line.  I applied mascara and Ardell 102 lashes.

CHEEKS:
I used Guerlain Bronzing powder #2 on her cheeks mixed with NARS Deep Throat blush.  I highlighted the tops of her cheek bones and down the bridge of her nose with MAC Mineralize Skin Finish in Soft & Gentle. 

LIPS:
I applied the same lip colours as Olivia & Martina to keep the focus on her eyes.


Sorry for the long post!  I hope these looks have inspired you to try something new for your next big night out!

x
Annemarie